Saturday, February 26, 2011

Years in the Making!


I used to sit up in our dusty dirty barn and dream of making it come alive. I would marvel at the handmade spikes holding all the rafters in place on the ridgepole that runs down the center forming the roofline. If you look at the picture, the very top beam on the left edge, you can still see some of the original bark on the tree that was used for the rafter.


What our barn needed to brighten it up was light and I had an idea. You see that vent at the very peak of the roof, that sits above a main beam. I knew we wouldn’t need that vent for ventilation once the barn was renovated so I climbed up on a ladder and did a little measuring…. I measured from the inside, to high on the outside for my taste.


A look from the inside where that vent used to be, that upper hole. That's the end that looks down our driveway and people can see it from the road. It's also the end where mister man built the first granite stone wall underneath the support beam from my last post. I knew after measuring a half round window would be perfect up there so armed with measurements mister man and I started our search for a window. 


And Voile, after a couple of years we found exactly what we were looking for and the perfect size. This half round window came out of a now defunct bank but there was only one problem, the window had single panes and would never pass code. So off it went to a window restorer and he simply cut the mullions in half, placed insulated glass in and made mullions to match for the other side. A boatload of money later and some else’s hard work and we have our window that will pass code! An antique/vintage window for our antique carriage barn.

What do you think of our window? Trust me the money we spent on the window and having it restored cost us less then buying a new window and this works perfectly. Wait until you see it installed!


Tuesday, February 22, 2011

Barn Renovation Part 2: An Engineering Feat!


I told you in my last post about our barn that the carnage wasn’t over and just look at what our contractors did! Can you imagine my face when I walked outside and saw our barn hanging by a thread? It was necessary in order to fix the water problem since water and wood don’t mix. I know it’s a little dark but if you look inside under the barn you’ll see that our foundation for the barn is made from stacked boulders. It won't fall since it goes back into the earth twelve feet! The foundation for our home is like that too in our basement and it’s stunning! Isn't the barn pretty nestled in the forest?


The earth came up on the sides of the barn and was rotting the wood so in order to stop that little problem we decide to use something that would never rot from water…stone! Both end walls will be built up out of antique granite block to the second floor crossbeams. Since this is the granite state and our home foundation is all granite we weren’t going outside of what is normal for our home.


That would be the husband laying the footers for the walls, he’s very handy to have about. No he isn’t a mason by trade but used to do it once upon a time in another life. You would think I would be married to the hulk since those cement blocks weigh 67 pounds apiece. Good thing he didn’t get mouthy with me since he’s already standing six feet under….;)


Up go the granite blocks, those only weigh 18 pounds apiece and he’s doing a double wall, one inside the barn, and one outside. The cement and one or two of the granite blocks will be buried once the earth is graded on the outside. The rebar in the middle helps to stabilize the walls.


Mister man had to hand cut those thick solid granite blocks to fit snugly around the boulders. Everything had to be precisely measured so when he reached the beam he wouldn’t have to cut any blocks or end up with any gaps. It’s amazing how he worked it all out but he has a saying: prior preparation prevents piss poor performance and trust me he did his prep work.


A corner that wraps around to the front or face of the barn, that corner will support one barn door when finished.


This is the end of the barn you can see from the street and as you’re coming up our drive.


Look at that, to the left of the picture, see that support beam hanging out in thin air…another water incident that will soon be taken care of and look, the wall is up to the beam!


Mister man finally got smart and hired our contractors’ 18-year-old son to labor for him and the kid didn’t whine once….now that’s amazing!


You can see from the inside how the block wall came right up to the crossbeam. Look right there in the very middle, you can see how the blocks were fitted right into the boulder wall. Oh and that yellow tubing you see snaking through several of my pictures....yeah, that would be the propane for my stove and oven. Imagine how exhilarated I was to see people cutting and sawing around it?


One wall up now to get mister man to clean up this colossal mess! Yes, this whole mess is just from the husband not to forget that the contractors were here working and making messes of their own!


Not only did everyone have messes working on the driveway but they took over my front yard as well!


And then more trucks arrived with more deliveries. The excavator thought it a good idea to park his bobcat on top of the husbands’ stone dust. To top it off the cement guy thought the stone dust was a great place to wash leftover cement into, do you know how that stuff sets up…it’s concrete! Trust me ladies this sort of work is not for the weak of heart to live around!

Stay tuned for next week when we feature….oh yeah more mess!


Friday, February 18, 2011

There is hope!


Look at this picture, I mean look at it, it’s grass and the dreaded tree root I always trip over poking through the snow and ice. I had a tear in my eye when I saw it this morning. After the winter we’ve had so far Mother Nature has taken pity on us and has given us two days of warmth unfortunately the cold returns tonight…ugh!


You can see the slump in the snow along Dylan dog’s path. Poor dog is so tired of being land locked on those paths and tried getting through the snow the other day only to sink up to his bloomers.


A garden bench and a marble angel finally making their way through the snow, she should have flown away when she had the chance!


Look, you see that dark round thing in the middle of the snow, that’s a garden urn making a reappearance. Sort of to the right of that urn there looks to big a large round area under the snow, that’s a very large round raised stone garden bed I built, it’ll be out soon…I HOPE!


If you click on the pictures you can bring them up bigger and you should on this one and look at that sky it’s the deepest of blues. I took this picture this morning from one of Dylan’s paths it looks back from our side field towards the side of our home.


For those of you following our barn renovation you can see some of the stonewalls holding that mountain back. Just think those walls have been there for over 200 years! Pretty amazing even to me and I look at them everyday. OK everyone think spring please!

Next up the second installment of our barn renovation!


Wednesday, February 16, 2011

Deconstruction of a Dream….Barn Renovation Part I


Our carriage barn dates from 1790 and had never been used as livable space until now and this is our journey of how we made it habitable. Some time just before 1830 the carriage barn was attached to our home via a mudroom with an extra room above. We know it was just before 1830 because of the way the boards had been hand planed. We had originally intended for the barn to be our new master suite but the size, over 1300 square feet, made it a little to big for our needs so the husband graciously offered it up to me to be used as my new studio for my business.


The barn creates an ell off our home and this end faces down our driveway and is visible from the street. Not much presence with those small windows and sea of white clapboard. There is an issue of water to be addressed with the barn. You can see at the right of the picture, the back part of the barn, the ground level starts almost half way up the barn. See all those stacked stones, that’s holding earth, the barn was built on the side of a mountain.


So time for the carnage to begin so we can go about creating this girls dream!


Day one the guys had the clapboards ripped off and the windows removed and our barn had never looked more dark and forlorn.


Opposite end of our barn that faces out into our backyard and forest, if you look to the left of the picture you can see how much the land is tiered with stonewalls. The lower part of the barn was more then likely used as a chicken coop at one time from the evidence we found under the floor, it’s now my husbands wood working shop. Notice that huge granite slab on the ground, that’s going out front and the thing weighs so much it was lifting the back end of the excavator off the ground. You can also see evidence of more water damage where the barn connects to the house, one beam was all but gone from deterioration.  


Inside the barn facing out to the street, aside from the windows being removed our contractors haven’t touched this area yet. This is how it looked when we purchased our home.


Opposite end of the barn, this end faces out to the backyard.


This view and the picture below is of the area above the mudroom, the part that connects the barn to our home, we loving call it the Annex. This room sits 3/4 of the way back from the street front of the barn.


Man it just makes me itchy seeing this picture there was old cellulose insulation in that roof and the guys were hacking up a lung after yanking it down. That door leads into my husbands office and our home.  Even though you see two heat vents near the door trust me there was no heat since those vents led to nothing, literally!


This is a view looking out the back of the barn, the wide opening had two wide doors so carriages and buggies could be rolled into the barn. Look through that opening and you can see the land starts to go up, that area is all forest.


A shot looking from one end to the other, the annex is to the right up two small steps. That board standing up in the middle of the room was the old staircase and it’s gone!


A shot towards the front of the house overlooking the front yard.


And there you have it the start of my dream…a real studio! But if you think the carnage and mayhem is over you haven’t seen anything yet! I hope you've enjoyed seeing the start of my dream and will continue to follow for weeks to come as my studio becomes a reality! 

Tuesday, February 8, 2011

Project Time!


Italian, 16th Century, cut and voided silk velvet from Genoa
Standing in at 26" x 20"

In case some of you don’t know I’m an antique textile dealer, I deal mainly in 15th –18th century European textiles and I make pillows out of fragments. Sometimes I get pieces in that are to big for a single pillow and I never cut pieces that are in mint to near mint condition. If they’re too small to make a hanging I mount them on a stretcher frame so they can be hung for display. Sometimes once mounted they don’t stand out or have as much presence as I think they should have so I give them the presence I feel they need. Hence the project!


I just happened to have purchase a 19th century antique frame a couple of years ago and have never found anything to place in it, the frame measures 52” x 45” so it’s quite considerable in size. The gold gilt is chipped and the gold leaf has tarnish some but I think that just gives it more character. So we're going to blend the two pieces together and make them a perfect pair! 

The things that I needed for this project are:
3/8” thick plywood, you want it thick enough so it doesn’t have any “bend” to it
cotton batting, silk velvet fabric, spray tacky glue, staple gun and staples


Mister Man, aka the husband, cut the plywood an eight of an inch shorter all the way around since the cotton batting and silk velvet will be wrapped to the backside and they take up frame space. Next cut a piece of batting to size and spray the plywood with your tacky glue and lay the batting over the plywood smoothing out any wrinkles. I repeated this step again to give a nice plump layer over the plywood. Be sure to wrap the batting over the edges and staple on the backside. Next simply lay your silk velvet over the cotton batting and start stapling the edges on the backside, DO NOT SPRAY GLUE THE SILK VELVET. I started at the top, then bottom and then the sides making sure the fabric was pulled tight but not to tightly and stapled on the backside as I went. Trim up the edges but not to short, insert your board into the frame and use small nail brads to secure into the frame.


Next it’s time to wire the backside of my frame for hanging. (I didn’t cover the backside of my frame because the only thing I was out of was brown craft paper.) Since this frame is heavy and large I thought it best to support the bottom so I used four screw eyes for wiring up my frame. As shown I ran the hanging wire all the way around looping it through the screw eyes twice for added security. Make sure your wire is rated for the weight of your frame.


Next it’s time to hang my frame and set up this very blank wall in my studio. When hanging something of size and weight you want to make sure you use two hangers and make sure they’re nailed into studs. Studs can be found by measuring from a corner over every 16”. Lets make this wall come alive!


Up goes my frame centered on the wall.


So my frame isn’t floating on that wall alone up go a pair of mounted circa 1600 Florentine silk velvet panels. The silk velvet on those panels is very cool, the design is done in REAL silver thread and the design is huge mainly because this fabric would have been used in place of wallpaper. Yes, this very expensive fabric covered walls!


Since I want to temporarily hang the mounted silk velvet in the center of my frame I had to come up with an idea.....safety pin anyone? I simply inserted a safety pin upside down into my padded velvet and the board behind balances and keeps the pin in  place. Next I just hung the mounted piece wire on its backside from the head of the safety pin, I created a hook of sorts.


Yep, works like a charm and it's easily removable since the frame isn't for sale. See, the mounted silk velvet looks like it's floating in the middle of that big frame.


Finish off with a few accessories and a little greenery and VOILE!
(Click on the picture if you would like to see bigger)


So what do you think of my little project, did I give my mounted piece more presence?

One wall completed now to decorate the rest of my studio but before I do that perhaps I should take you backwards in time and start from the beginning on how my studio came to be........

Wednesday, February 2, 2011

Walk this way......

all Italian, 16th century, silk velvets
image is my own

I’ve been doing some research on some new/old velvets I received this week and in my wanderings about computer land I found some tasty morsels…. amazing old shoes! I’m sorry but Manolo Blahnik has nothing on these beauties. Trish over at Trouvais is going to love these!

Chopines shoes, circa 1600, Venice
image above and below via V&A

Shoes of this type are called chopines or pantobles. The design was based on shoes worn in Turkish baths. Could you imagine wearing shoes made of wood covered with silk velvet and trimmed with silk ribbon and gold lace?


images of shoes and dress via book
"20,000 Years of Fashion" by Francois Boucher

Here are a couple of more chopine shoes, they don’t look very easy to walk or balance in especially when you’re wearing a gown like the one below.


I think if I had to wear that heavy gown laced up my neck while balancing on the front part of my feet I too think I would need a minion to balance on!

French, made 1750 - 1760
image via V&A

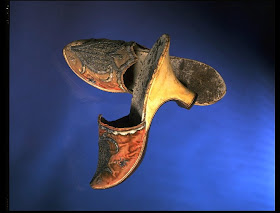
Women's high-heeled mules, commonly known as slippers. These have a fairly high heel and a pointed toe. The velvet uppers are decorated with metal thread. The embroidery was all done by hand and without electricity to see by, amazing piece of artwork.

England, made 1650 - 1660
image above and below via V&A

Pair of women's mules or backless slippers are made of velvet embroidered with silver-gilt thread. From about 1550 to 1700, embroidery became very fashionable and mules were often decorated in this way. Talk about luxury! 


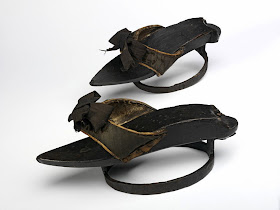
Pattens, Great Britain, made 1720s - 30s
image via V&A

Pattens were worn to lift the shoe out of the dirt and damp while balancing on the iron ring. The shoe would have been fastened into the patten by means of ribbon-laced latchets covered in velvet. Sounds convenient huh?

image via Christie's auction catalog

Pair of 18th century green silk damask shoes and a pair of pattens, both with gilt braid. These pattens don’t have the iron ring but you can see how they would have fit under the shoes, that hump would have been up under the heel.  

image via Christie's auction catalog

Yellow silk brocade shoes from the 18th century. Aren’t they wonderful? Shoes like these can cost anywhere from $7000 to $14,000 at auction today and no, I didn’t buy them!

image via "Marie-Antoinette Style" by Adrien Goetz

Aren't the shoes amazing all grouped together?

image via my feet!

Unfortunately it’s time to come back to my reality of snow and functional but ugly footwear. Nice huh?
 
So which century of footwear are your favorites?

I hope you are all staying warm and dry on this very snowy day!